
安装过程:后续有权重下载地址
https://github.com/facebookresearch/sam3?tab=readme-ov-file
按照上述内容直接安装。
没魔法的版本:
创建一个新的 Conda 环境:
conda create -n sam3 python=3.12
conda deactivate
conda activate sam3
安装2.7torch
pip install torch==2.7.0 torchvision torchaudio --index-url https://download.pytorch.org/whl/cu126克隆环境
通过网盘分享的文件:sam3代码
链接: https://pan.baidu.com/s/1fx6HjeO4NAwqmY3FpF1_rA?pwd=1111 提取码: 1111
进入目录后终端输入:
pip install -e .安装其他依赖:
# For running example notebooks
pip install -e ".[notebooks]"

# For development
pip install -e ".[train,dev]"
windows安装过程中出现的问题
如果出现了关于 triton 的报错问题,给予下述解决方法:
在终端新建立的环境中进行以下内容的安装:
pip install triton-windows给一个简单的图片测试案例:
import torch
import numpy as np
import matplotlib.pyplot as plt
from PIL import Image
from sam3.model_builder import build_sam3_image_model
from sam3.model.sam3_image_processor import Sam3Processor

# Load the model
model = build_sam3_image_model(checkpoint_path="checkpoint/sam3.pt")

processor = Sam3Processor(model)
# Load an image
image = Image.open(r"D:\vscode\python_project\sam3-main\cat1.jpg")
inference_state = processor.set_image(image)
# Prompt the model with text
output = processor.set_text_prompt(state=inference_state, prompt="A cat's ears")

# Get the masks, bounding boxes, and scores
masks, boxes, scores = output["masks"], output["boxes"], output["scores"]

# 转移到CPU
masks = masks.cpu().numpy()
boxes = boxes.cpu().numpy()
scores = scores.cpu().numpy()

print(f"找到 {len(masks)} 个目标")
print(f"置信度分数: {scores}")
print(f"边界框:\n{boxes}")

# 创建颜色映射,为每个实例分配不同颜色
colors = plt.cm.Set3(np.linspace(0, 1, len(masks)))

# 创建一张包含所有实例的大图
fig, axes = plt.subplots(2, 2, figsize=(15, 12))
axes = axes.ravel()

# 1. 显示原图
axes[0].imshow(image)
axes[0].set_title("Original Image")
axes[0].axis('off')

# 2. 显示所有实例的合成mask
img_array = np.array(image)
all_masks_overlay = img_array.copy()

for i, (mask, score, color) in enumerate(zip(masks, scores, colors)):
    # 确保mask是2D的
    if len(mask.shape) == 3:
        mask = mask[0]

    # 调整mask大小以匹配图像
    if mask.shape != img_array.shape[:2]:
        from scipy.ndimage import zoom
        scale_y = img_array.shape[0] / mask.shape[0]
        scale_x = img_array.shape[1] / mask.shape[1]
        mask = zoom(mask, (scale_y, scale_x), order=0) > 0.5

    # 为每个mask创建彩色覆盖
    mask_bool = mask > 0.5
    # 使用不同颜色的半透明覆盖
    rgb_color = color[:3]  # 取RGB值,忽略alpha
    all_masks_overlay[mask_bool] = all_masks_overlay[mask_bool] * 0.4 + np.array(rgb_color) * 255 * 0.6

axes[1].imshow(all_masks_overlay.astype(np.uint8))
axes[1].set_title(f"All Masks Overlay\n({len(masks)} instances)")
axes[1].axis('off')

# 3. 显示带边界框的原图
axes[2].imshow(image)
for i, (box, score, color) in enumerate(zip(boxes, scores, colors)):
    x1, y1, x2, y2 = box
    rect = plt.Rectangle((x1, y1), x2-x1, y2-y1,
                         fill=False, color=color, linewidth=3)
    axes[2].add_patch(rect)
    # 添加标签
    axes[2].text(x1, y1-5, f"Obj {i+1}: {score:.3f}",
                bbox=dict(boxstyle="round,pad=0.3", fc=color, alpha=0.7),
                fontsize=8, color='black')
axes[2].set_title("Bounding Boxes with Scores")
axes[2].axis('off')

# 4. 显示所有mask的合成图(黑白)
combined_mask = np.zeros(img_array.shape[:2], dtype=bool)
for i, mask in enumerate(masks):
    if len(mask.shape) == 3:
        mask = mask[0]

    # 调整mask大小以匹配图像
    if mask.shape != img_array.shape[:2]:
        from scipy.ndimage import zoom
        scale_y = img_array.shape[0] / mask.shape[0]
        scale_x = img_array.shape[1] / mask.shape[1]
        mask = zoom(mask, (scale_y, scale_x), order=0) > 0.5

    combined_mask = np.logical_or(combined_mask, mask > 0.5)

axes[3].imshow(combined_mask, cmap='gray')
axes[3].set_title(f"Combined Mask\n({len(masks)} instances)")
axes[3].axis('off')

plt.tight_layout()
plt.savefig("all_instances_result.png", dpi=150, bbox_inches='tight')
print("\n所有实例结果已保存到 all_instances_result.png")
plt.show()

# 保存单独的mask
for i, mask in enumerate(masks):
    if len(mask.shape) == 3:
        mask = mask[0]
    mask_image = Image.fromarray((mask * 255).astype(np.uint8))
    mask_image.save(f"mask_{i}.png")
    print(f"Mask {i} 已保存到 mask_{i}.png")

# 额外:创建一个包含所有实例的详细对比图
if len(masks) > 0:
    # 计算需要多少行和列
    n_cols = min(4, len(masks))
    n_rows = (len(masks) + n_cols - 1) // n_cols

    fig2, axes2 = plt.subplots(n_rows, n_cols, figsize=(4*n_cols, 4*n_rows))
    if n_rows == 1:
        axes2 = axes2.reshape(1, -1)
    elif n_cols == 1:
        axes2 = axes2.reshape(-1, 1)

    for i, (mask, box, score) in enumerate(zip(masks, boxes, scores)):
        row = i // n_cols
        col = i % n_cols

        # 确保mask是2D的
        if len(mask.shape) == 3:
            mask = mask[0]

        # 调整mask大小以匹配图像
        if mask.shape != img_array.shape[:2]:
            from scipy.ndimage import zoom
            scale_y = img_array.shape[0] / mask.shape[0]
            scale_x = img_array.shape[1] / mask.shape[1]
            mask = zoom(mask, (scale_y, scale_x), order=0) > 0.5

        # 创建彩色mask overlay
        overlay = img_array.copy()
        mask_bool = mask > 0.5
        color = colors[i]
        rgb_color = color[:3]
        overlay[mask_bool] = overlay[mask_bool] * 0.5 + np.array(rgb_color) * 255 * 0.5

        axes2[row, col].imshow(overlay.astype(np.uint8))

        # 绘制边界框
        x1, y1, x2, y2 = box
        rect = plt.Rectangle((x1, y1), x2-x1, y2-y1,
                             fill=False, color=color, linewidth=2)
        axes2[row, col].add_patch(rect)

        axes2[row, col].set_title(f"Instance {i+1}\nScore: {score:.3f}")
        axes2[row, col].axis('off')

    # 隐藏多余的子图
    for i in range(len(masks), n_rows * n_cols):
        row = i // n_cols
        col = i % n_cols
        axes2[row, col].axis('off')

    plt.tight_layout()
    plt.savefig("detailed_instances_comparison.png", dpi=150, bbox_inches='tight')
    print("详细实例对比图已保存到 detailed_instances_comparison.png")
    plt.show()
在代码中我们给出了一个文本的prompt为:“cat”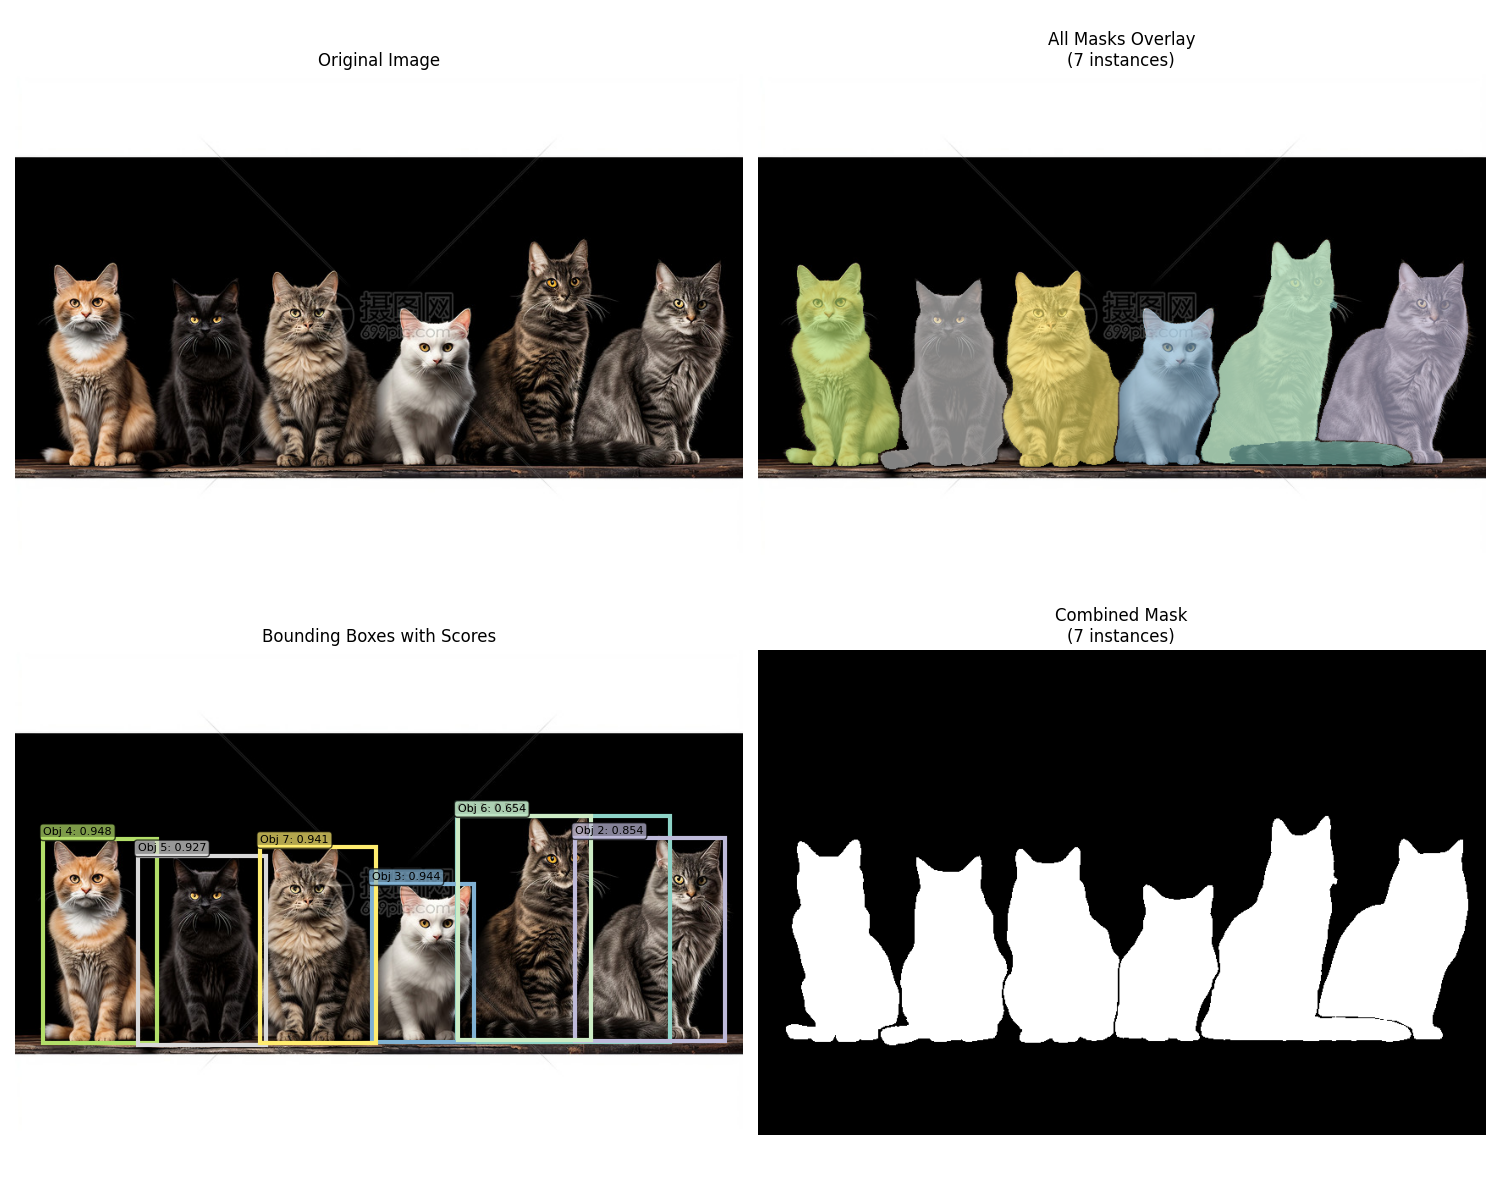
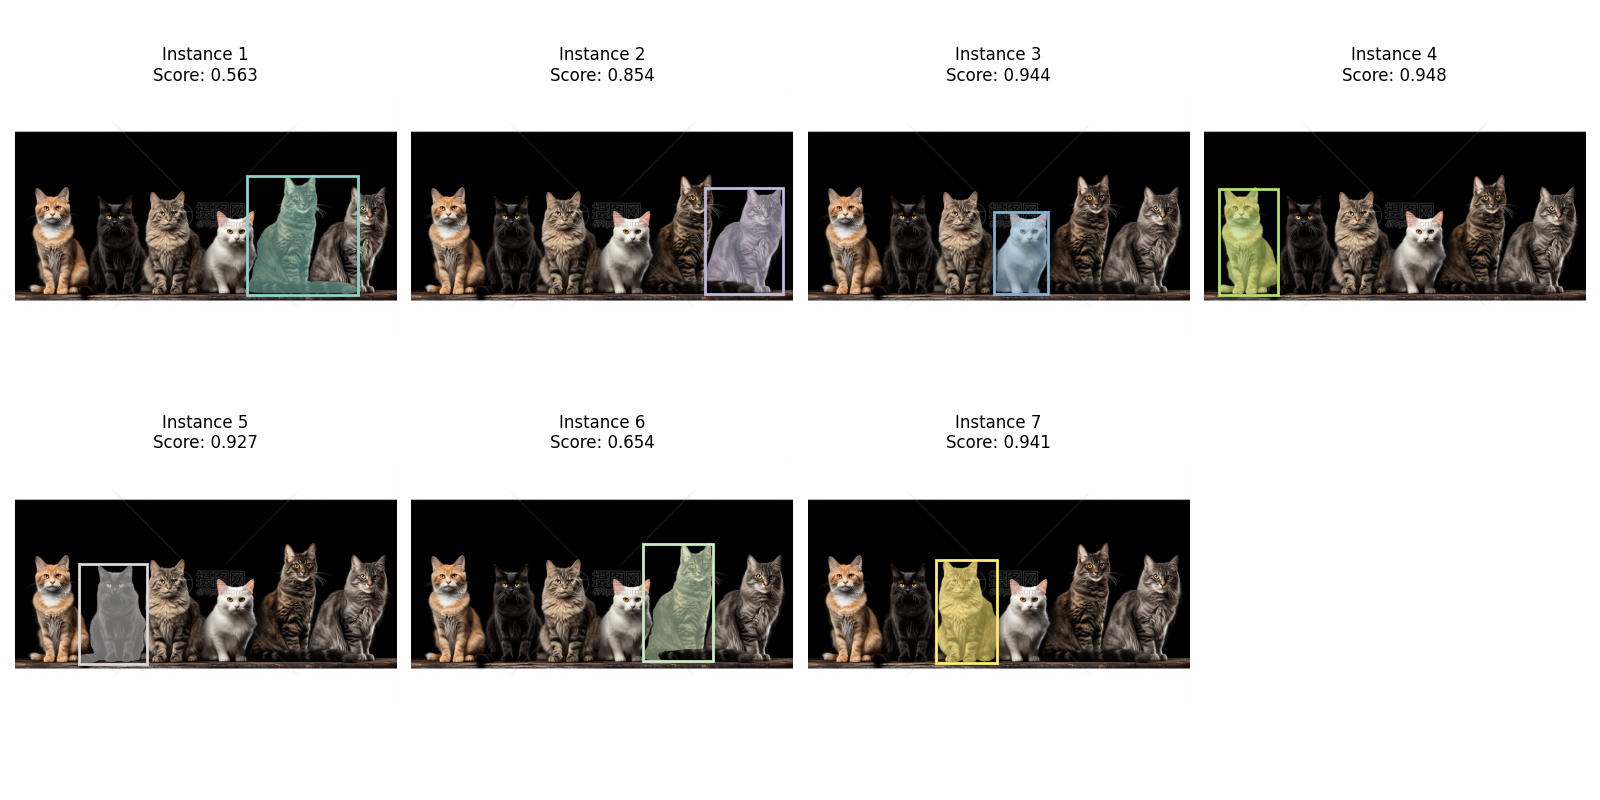
分割效果是真的无敌,当然美中不足之处在于第6个实例猫的尾巴没有被分割好,同实例1所示,分割效果不错。
视频测试代码如下:
# import torch
# import numpy as np
# from PIL import Image
# import cv2
# from sam3.model_builder import build_sam3_video_predictor

# # ============ 配置参数 ============
# VIDEO_PATH = "2.mp4"
# TEXT_PROMPT = "Bottle"
# CHECKPOINT_PATH = "checkpoint/sam3.pt"
# OUTPUT_VIDEO_PATH = "output_video_with_masks.mp4"

# # ============ 1. 加载模型 ============
# print("加载模型...")
# video_predictor = build_sam3_video_predictor(checkpoint_path=CHECKPOINT_PATH)

# # ============ 2. 读取视频信息 ============
# cap = cv2.VideoCapture(VIDEO_PATH)
# fps = int(cap.get(cv2.CAP_PROP_FPS))
# width = int(cap.get(cv2.CAP_PROP_FRAME_WIDTH))
# height = int(cap.get(cv2.CAP_PROP_FRAME_HEIGHT))
# total_frames = int(cap.get(cv2.CAP_PROP_FRAME_COUNT))
# cap.release()
# print(f"视频信息: {width}x{height}, {fps}fps, 总帧数: {total_frames}")

# # ============ 3. 开始会话 ============
# print(f"\n开始处理视频: {VIDEO_PATH}")
# response = video_predictor.handle_request(
#     request=dict(
#         type="start_session",
#         resource_path=VIDEO_PATH,
#     )
# )
# session_id = response["session_id"]
# print(f"会话ID: {session_id}")

# # ============ 4. 在第0帧添加文本提示 ============
# print(f"\n添加文本提示: '{TEXT_PROMPT}'")
# response = video_predictor.handle_request(
#     request=dict(
#         type="add_prompt",
#         session_id=session_id,
#         frame_index=0,
#         text=TEXT_PROMPT,
#     )
# )

# # 获取第0帧的输出
# output = response["outputs"]
# print(f"第0帧输出:")
# print(f"  out_obj_ids: {output['out_obj_ids']}")
# print(f"  out_probs: {output['out_probs']}")
# print(f"  out_binary_masks shape: {output['out_binary_masks'].shape}")

# # ============ 5. 使用 handle_stream_request 调用 propagate_in_video ============
# print("\n开始传播分割到所有帧 (使用 handle_stream_request)...")

# # 存储所有帧的mask
# frame_masks = {}

# # 关键!使用 handle_stream_request 而不是 handle_request
# # propagate_in_video 是一个生成器,通过 handle_stream_request 调用
# for result in video_predictor.handle_stream_request(
#     request=dict(
#         type="propagate_in_video",
#         session_id=session_id,
#         propagation_direction="forward",  # 可以是 "forward", "backward", "both"
#         start_frame_index=0,
#         max_frame_num_to_track=None,  # None表示跟踪所有帧
#     )
# ):
#     frame_idx = result["frame_index"]
#     outputs = result["outputs"]
#     frame_masks[frame_idx] = outputs

#     if frame_idx % 50 == 0:
#         print(f"  传播进度: 帧 {frame_idx}")

# print(f"\n共获取 {len(frame_masks)} 帧的分割结果")

# # 打印第一个有效帧的输出结构
# if frame_masks:
#     first_key = list(frame_masks.keys())[0]
#     first_output = frame_masks[first_key]
#     print(f"\n帧输出结构 (帧 {first_key}):")
#     for k, v in first_output.items():
#         if isinstance(v, np.ndarray):
#             print(f"  {k}: ndarray shape={v.shape}")
#         elif isinstance(v, torch.Tensor):
#             print(f"  {k}: Tensor shape={v.shape}")
#         else:
#             print(f"  {k}: {type(v).__name__}")

# # ============ 6. 写入输出视频 ============
# print("\n开始写入输出视频...")
# cap = cv2.VideoCapture(VIDEO_PATH)
# fourcc = cv2.VideoWriter_fourcc(*'mp4v')
# out = cv2.VideoWriter(OUTPUT_VIDEO_PATH, fourcc, fps, (width, height))

# for frame_idx in range(total_frames):
#     ret, frame = cap.read()
#     if not ret:
#         break

#     result_frame = frame.copy()

#     # 获取当前帧的mask
#     if frame_idx in frame_masks:
#         data = frame_masks[frame_idx]
#         masks = data['out_binary_masks']  # shape: (num_objects, H, W)
#         probs = data['out_probs']
#         boxes = data.get('out_boxes_xywh', None)
#         obj_ids = data.get('out_obj_ids', None)

#         # 为每个目标分配不同的颜色 (BGR格式)
#         colors = [
#             (0, 255, 0),    # 绿色
#             (255, 0, 0),    # 蓝色
#             (0, 255, 255),  # 黄色
#             (255, 0, 255),  # 紫色
#             (0, 165, 255),  # 橙色
#             (255, 255, 0),  # 青色
#         ]

#         # 检查是否有有效的mask
#         if masks is not None and len(masks) > 0 and masks.shape[0] > 0:
#             num_objects = masks.shape[0]

#             # 遍历所有检测到的目标
#             for obj_idx in range(num_objects):
#                 # 获取当前目标的mask
#                 mask = masks[obj_idx]

#                 # 处理mask尺寸
#                 if mask.shape == (width, height):  # (1280, 720)
#                     mask = mask.T  # 转为 (720, 1280)
#                 elif mask.shape != (height, width):
#                     mask = cv2.resize(mask.astype(np.float32), (width, height),
#                                      interpolation=cv2.INTER_NEAREST)

#                 # 确保是二值mask
#                 mask_bool = mask > 0.5

#                 if np.any(mask_bool):
#                     # 选择颜色
#                     color = colors[obj_idx % len(colors)]

#                     # 创建彩色半透明覆盖
#                     overlay = result_frame.copy()
#                     overlay[mask_bool] = color
#                     result_frame = cv2.addWeighted(result_frame, 0.6, overlay, 0.4, 0)

#                     # 绘制轮廓 (使用相同颜色但更亮)
#                     mask_uint8 = (mask_bool * 255).astype(np.uint8)
#                     contours, _ = cv2.findContours(mask_uint8, cv2.RETR_EXTERNAL,
#                                                    cv2.CHAIN_APPROX_SIMPLE)
#                     cv2.drawContours(result_frame, contours, -1, color, 2)

#                     # 绘制边界框
#                     if boxes is not None and obj_idx < len(boxes):
#                         box = boxes[obj_idx]
#                         x, y, w, h = box
#                         cv2.rectangle(result_frame, (int(x), int(y)),
#                                      (int(x + w), int(y + h)), color, 2)

#                         # 在边界框上方显示目标ID和置信度
#                         prob = probs[obj_idx] if probs is not None and obj_idx < len(probs) else 0
#                         obj_id = obj_ids[obj_idx] if obj_ids is not None and obj_idx < len(obj_ids) else obj_idx
#                         label = f"ID:{obj_id} P:{prob:.2f}"
#                         cv2.putText(result_frame, label, (int(x), int(y) - 5),
#                                    cv2.FONT_HERSHEY_SIMPLEX, 0.5, color, 2)

#             # 显示检测到的目标数量
#             cv2.putText(result_frame, f"Objects: {num_objects}", (10, 60),
#                        cv2.FONT_HERSHEY_SIMPLEX, 0.7, (0, 255, 255), 2)
#         else:
#             # 没有检测到目标,显示提示
#             cv2.putText(result_frame, "No detection", (10, 60),
#                        cv2.FONT_HERSHEY_SIMPLEX, 0.7, (0, 0, 255), 2)

#     # 添加帧号
#     cv2.putText(result_frame, f"Frame: {frame_idx}", (10, 30),
#                cv2.FONT_HERSHEY_SIMPLEX, 0.8, (255, 255, 255), 2)

#     out.write(result_frame)

#     if frame_idx % 50 == 0:
#         print(f"  写入进度: {frame_idx}/{total_frames}")

# cap.release()
# out.release()

# # ============ 7. 关闭会话 ============
# video_predictor.handle_request(
#     request=dict(type="close_session", session_id=session_id)
# )

# print(f"\n完成!输出保存到: {OUTPUT_VIDEO_PATH}")

# # ============ 8. 创建预览GIF ============
# print("\n创建预览GIF...")
# cap = cv2.VideoCapture(OUTPUT_VIDEO_PATH)
# gif_frames = []
# for i in range(min(50, total_frames)):
#     ret, frame = cap.read()
#     if not ret:
#         break
#     frame_small = cv2.resize(frame, (320, 180))
#     gif_frames.append(Image.fromarray(cv2.cvtColor(frame_small, cv2.COLOR_BGR2RGB)))

# if gif_frames:
#     gif_frames[0].save("preview.gif", save_all=True, append_images=gif_frames[1:],
#                        duration=100, loop=0)
#     print("预览GIF已保存: preview.gif")

# cap.release()
# print("\n全部完成!")

import torch
import numpy as np
from PIL import Image
import cv2
from sam3.model_builder import build_sam3_video_predictor

# ============ 配置参数 ============
VIDEO_PATH = "5.mp4"
TEXT_PROMPT = "people"
CHECKPOINT_PATH = "checkpoint/sam3.pt"
OUTPUT_VIDEO_PATH = "output_video_with_masks.mp4"

# ============ 1. 加载模型 ============
print("加载模型...")
video_predictor = build_sam3_video_predictor(checkpoint_path=CHECKPOINT_PATH)

# ============ 2. 读取视频信息 ============
cap = cv2.VideoCapture(VIDEO_PATH)
fps = int(cap.get(cv2.CAP_PROP_FPS))
width = int(cap.get(cv2.CAP_PROP_FRAME_WIDTH))
height = int(cap.get(cv2.CAP_PROP_FRAME_HEIGHT))
total_frames = int(cap.get(cv2.CAP_PROP_FRAME_COUNT))
cap.release()
print(f"视频信息: {width}x{height}, {fps}fps, 总帧数: {total_frames}")

# ============ 3. 开始会话 ============
print(f"\n开始处理视频: {VIDEO_PATH}")
response = video_predictor.handle_request(
    request=dict(
        type="start_session",
        resource_path=VIDEO_PATH,
    )
)
session_id = response["session_id"]
print(f"会话ID: {session_id}")

# ============ 4. 在第0帧添加文本提示 ============
print(f"\n添加文本提示: '{TEXT_PROMPT}'")
response = video_predictor.handle_request(
    request=dict(
        type="add_prompt",
        session_id=session_id,
        frame_index=0,
        text=TEXT_PROMPT,
    )
)

# 获取第0帧的输出
output = response["outputs"]
print(f"第0帧输出:")
print(f"  out_obj_ids: {output['out_obj_ids']}")
print(f"  out_probs: {output['out_probs']}")
print(f"  out_binary_masks shape: {output['out_binary_masks'].shape}")

# ============ 5. 使用 handle_stream_request 调用 propagate_in_video ============
print("\n开始传播分割到所有帧 (使用 handle_stream_request)...")

# 存储所有帧的mask
frame_masks = {}

# 关键!使用 handle_stream_request 而不是 handle_request
# propagate_in_video 是一个生成器,通过 handle_stream_request 调用
for result in video_predictor.handle_stream_request(
    request=dict(
        type="propagate_in_video",
        session_id=session_id,
        propagation_direction="forward",  # 可以是 "forward", "backward", "both"
        start_frame_index=0,
        max_frame_num_to_track=None,  # None表示跟踪所有帧
    )
):
    frame_idx = result["frame_index"]
    outputs = result["outputs"]
    frame_masks[frame_idx] = outputs

    if frame_idx % 50 == 0:
        print(f"  传播进度: 帧 {frame_idx}")

print(f"\n共获取 {len(frame_masks)} 帧的分割结果")

# 打印第一个有效帧的输出结构
if frame_masks:
    first_key = list(frame_masks.keys())[0]
    first_output = frame_masks[first_key]
    print(f"\n帧输出结构 (帧 {first_key}):")
    for k, v in first_output.items():
        if isinstance(v, np.ndarray):
            print(f"  {k}: ndarray shape={v.shape}")
        elif isinstance(v, torch.Tensor):
            print(f"  {k}: Tensor shape={v.shape}")
        else:
            print(f"  {k}: {type(v).__name__}")

# ============ 6. 写入输出视频 ============
print("\n开始写入输出视频...")
cap = cv2.VideoCapture(VIDEO_PATH)
fourcc = cv2.VideoWriter_fourcc(*'mp4v')
out = cv2.VideoWriter(OUTPUT_VIDEO_PATH, fourcc, fps, (width, height))

# 为每个目标分配不同的颜色 (BGR格式)
colors = [
    (0, 255, 0),    # 绿色
    (255, 0, 0),    # 蓝色
    (0, 255, 255),  # 黄色
    (255, 0, 255),  # 紫色
    (0, 165, 255),  # 橙色
    (255, 255, 0),  # 青色
    (128, 0, 128),  # 深紫色
    (0, 128, 128),  # 深青色
    (128, 128, 0),  # 橄榄色
    (128, 0, 0),    # 深蓝色
    (0,0,0)
]

for frame_idx in range(total_frames):
    ret, frame = cap.read()
    if not ret:
        break

    result_frame = frame.copy()

    # 获取当前帧的mask
    if frame_idx in frame_masks:
        data = frame_masks[frame_idx]
        masks = data['out_binary_masks']  # shape: (num_objects, H, W)
        probs = data['out_probs']
        boxes = data.get('out_boxes_xywh', None)
        obj_ids = data.get('out_obj_ids', None)

        # 检查是否有有效的mask
        if masks is not None and len(masks) > 0 and masks.shape[0] > 0:
            num_objects = masks.shape[0]

            # 遍历所有检测到的目标
            for obj_idx in range(num_objects):
                # 获取当前目标的mask
                mask = masks[obj_idx]

                # 处理mask尺寸
                if mask.shape == (width, height):  # (1280, 720)
                    mask = mask.T  # 转为 (720, 1280)
                elif mask.shape != (height, width):
                    mask = cv2.resize(mask.astype(np.float32), (width, height),
                                     interpolation=cv2.INTER_NEAREST)

                # 确保是二值mask
                mask_bool = mask > 0.5

                if np.any(mask_bool):
                    # 选择颜色
                    color = colors[obj_idx % len(colors)]

                    # 创建彩色半透明覆盖
                    overlay = result_frame.copy()
                    overlay[mask_bool] = color
                    result_frame = cv2.addWeighted(result_frame, 0.6, overlay, 0.4, 0)

                    # 绘制轮廓 (使用相同颜色但更亮)
                    mask_uint8 = (mask_bool * 255).astype(np.uint8)
                    contours, _ = cv2.findContours(mask_uint8, cv2.RETR_EXTERNAL,
                                                   cv2.CHAIN_APPROX_SIMPLE)
                    cv2.drawContours(result_frame, contours, -1, color, 2)

                    # 计算mask的质心
                    M = cv2.moments(mask_uint8)
                    if M["m00"] != 0:
                        cx = int(M["m10"] / M["m00"])
                        cy = int(M["m01"] / M["m00"])

                        # 在质心位置绘制ID
                        obj_id = obj_ids[obj_idx] if obj_ids is not None and obj_idx < len(obj_ids) else obj_idx
                        prob = probs[obj_idx] if probs is not None and obj_idx < len(probs) else 0

                        # 创建背景矩形使文本更易读
                        text = f"ID:{obj_id}"
                        text_size = cv2.getTextSize(text, cv2.FONT_HERSHEY_SIMPLEX, 0.8, 2)[0]
                        cv2.rectangle(result_frame,
                                     (cx - text_size[0]//2 - 5, cy - text_size[1]//2 - 5),
                                     (cx + text_size[0]//2 + 5, cy + text_size[1]//2 + 5),
                                     (0, 0, 0), -1)  # 黑色背景

                        # 绘制ID文本
                        cv2.putText(result_frame, text, (cx - text_size[0]//2, cy + text_size[1]//2),
                                   cv2.FONT_HERSHEY_SIMPLEX, 0.8, color, 2)

                    # 绘制边界框
                    if boxes is not None and obj_idx < len(boxes):
                        box = boxes[obj_idx]
                        x, y, w, h = box
                        cv2.rectangle(result_frame, (int(x), int(y)),
                                     (int(x + w), int(y + h)), color, 2)

                        # 在边界框上方显示置信度
                        label = f"P:{prob:.2f}"
                        cv2.putText(result_frame, label, (int(x), int(y) - 5),
                                   cv2.FONT_HERSHEY_SIMPLEX, 0.5, color, 2)

            # 显示检测到的目标数量
            cv2.putText(result_frame, f"Objects: {num_objects}", (10, 60),
                       cv2.FONT_HERSHEY_SIMPLEX, 0.7, (0, 255, 255), 2)
        else:
            # 没有检测到目标,显示提示
            cv2.putText(result_frame, "No detection", (10, 60),
                       cv2.FONT_HERSHEY_SIMPLEX, 0.7, (0, 0, 255), 2)

    # 添加帧号
    cv2.putText(result_frame, f"Frame: {frame_idx}", (10, 30),
               cv2.FONT_HERSHEY_SIMPLEX, 0.8, (255, 255, 255), 2)

    out.write(result_frame)

    if frame_idx % 50 == 0:
        print(f"  写入进度: {frame_idx}/{total_frames}")

cap.release()
out.release()

# ============ 7. 关闭会话 ============
video_predictor.handle_request(
    request=dict(type="close_session", session_id=session_id)
)

print(f"\n完成!输出保存到: {OUTPUT_VIDEO_PATH}")

# ============ 8. 创建预览GIF ============
print("\n创建预览GIF...")
cap = cv2.VideoCapture(OUTPUT_VIDEO_PATH)
gif_frames = []
for i in range(min(50, total_frames)):
    ret, frame = cap.read()
    if not ret:
        break
    frame_small = cv2.resize(frame, (320, 180))
    gif_frames.append(Image.fromarray(cv2.cvtColor(frame_small, cv2.COLOR_BGR2RGB)))

if gif_frames:
    gif_frames[0].save("preview.gif", save_all=True, append_images=gif_frames[1:],
                       duration=100, loop=0)
    print("预览GIF已保存: preview.gif")

cap.release()
print("\n全部完成!")
实时外接摄像头:
import torch
import numpy as np
import cv2
from PIL import Image
from sam3.model_builder import build_sam3_image_model
from sam3.model.sam3_image_processor import Sam3Processor
import time
from scipy.optimize import linear_sum_assignment

# ============ 配置参数 ============
TEXT_PROMPT = "bottle"
CHECKPOINT_PATH = "checkpoint/sam3.pt"
CAMERA_ID = 0

DISPLAY_WIDTH = 1280
DISPLAY_HEIGHT = 720

# 跟踪参数
IOU_THRESHOLD = 0.3  # IoU阈值,用于匹配实例
MAX_DISAPPEARED = 10  # 物体消失多少帧后删除ID

# ============ 实例跟踪器 ============
class InstanceTracker:
    """简单的实例跟踪器,基于IoU匹配"""

    def __init__(self, iou_threshold=0.3, max_disappeared=10):
        self.next_id = 0
        self.objects = {}  # {id: {"box": box, "disappeared": count}}
        self.iou_threshold = iou_threshold
        self.max_disappeared = max_disappeared

    def compute_iou(self, box1, box2):
        """计算两个框的IoU"""
        x1_min, y1_min, x1_max, y1_max = box1
        x2_min, y2_min, x2_max, y2_max = box2

        # 计算交集
        inter_x_min = max(x1_min, x2_min)
        inter_y_min = max(y1_min, y2_min)
        inter_x_max = min(x1_max, x2_max)
        inter_y_max = min(y1_max, y2_max)

        if inter_x_max < inter_x_min or inter_y_max < inter_y_min:
            return 0.0

        inter_area = (inter_x_max - inter_x_min) * (inter_y_max - inter_y_min)

        # 计算并集
        box1_area = (x1_max - x1_min) * (y1_max - y1_min)
        box2_area = (x2_max - x2_min) * (y2_max - y2_min)
        union_area = box1_area + box2_area - inter_area

        return inter_area / union_area if union_area > 0 else 0.0

    def update(self, boxes):
        """
        更新跟踪器
        boxes: 当前帧检测到的边界框 (N, 4) [x1, y1, x2, y2]
        返回: 分配的ID列表
        """
        if len(boxes) == 0:
            # 没有检测到物体,增加所有现有物体的消失计数
            for obj_id in list(self.objects.keys()):
                self.objects[obj_id]["disappeared"] += 1
                if self.objects[obj_id]["disappeared"] > self.max_disappeared:
                    del self.objects[obj_id]
            return []

        # 如果没有现有物体,为所有检测创建新ID
        if len(self.objects) == 0:
            ids = []
            for box in boxes:
                self.objects[self.next_id] = {
                    "box": box,
                    "disappeared": 0
                }
                ids.append(self.next_id)
                self.next_id += 1
            return ids

        # 计算IoU矩阵
        object_ids = list(self.objects.keys())
        iou_matrix = np.zeros((len(object_ids), len(boxes)))

        for i, obj_id in enumerate(object_ids):
            old_box = self.objects[obj_id]["box"]
            for j, new_box in enumerate(boxes):
                iou_matrix[i, j] = self.compute_iou(old_box, new_box)

        # 使用匈牙利算法进行最优匹配
        # 注意:linear_sum_assignment最小化成本,所以我们用1-IoU
        cost_matrix = 1 - iou_matrix
        row_indices, col_indices = linear_sum_assignment(cost_matrix)

        # 分配ID
        assigned_ids = [-1] * len(boxes)
        matched_objects = set()
        matched_detections = set()

        for row, col in zip(row_indices, col_indices):
            if iou_matrix[row, col] >= self.iou_threshold:
                obj_id = object_ids[row]
                assigned_ids[col] = obj_id
                self.objects[obj_id]["box"] = boxes[col]
                self.objects[obj_id]["disappeared"] = 0
                matched_objects.add(obj_id)
                matched_detections.add(col)

        # 为未匹配的检测创建新ID
        for i in range(len(boxes)):
            if i not in matched_detections:
                self.objects[self.next_id] = {
                    "box": boxes[i],
                    "disappeared": 0
                }
                assigned_ids[i] = self.next_id
                self.next_id += 1

        # 增加未匹配物体的消失计数
        for obj_id in object_ids:
            if obj_id not in matched_objects:
                self.objects[obj_id]["disappeared"] += 1
                if self.objects[obj_id]["disappeared"] > self.max_disappeared:
                    del self.objects[obj_id]

        return assigned_ids

    def reset(self):
        """重置跟踪器"""
        self.next_id = 0
        self.objects = {}

# ============ 1. 加载模型 ============
print("加载SAM3图像模型...")
model = build_sam3_image_model(checkpoint_path=CHECKPOINT_PATH)
processor = Sam3Processor(model)
print("✓ 模型加载完成!")

# ============ 2. 打开摄像头 ============
print(f"打开摄像头 {CAMERA_ID}...")
cap = cv2.VideoCapture(CAMERA_ID)
cap.set(cv2.CAP_PROP_FRAME_WIDTH, DISPLAY_WIDTH)
cap.set(cv2.CAP_PROP_FRAME_HEIGHT, DISPLAY_HEIGHT)

width = int(cap.get(cv2.CAP_PROP_FRAME_WIDTH))
height = int(cap.get(cv2.CAP_PROP_FRAME_HEIGHT))
print(f"✓ 摄像头分辨率: {width}x{height}")

# ============ 3. 初始化 ============
tracker = InstanceTracker(iou_threshold=IOU_THRESHOLD, max_disappeared=MAX_DISAPPEARED)

colors = [
    (0, 255, 0), (255, 0, 0), (0, 255, 255), (255, 0, 255),
    (0, 165, 255), (255, 255, 0), (128, 0, 128), (0, 128, 128),
    (255, 128, 0), (128, 255, 0), (0, 128, 255), (255, 0, 128),
]

is_tracking = False
click_points = []
click_labels = []
click_mode = False
current_prompt = TEXT_PROMPT
use_text = True

fps_start = time.time()
fps_count = 0
display_fps = 0

# ============ 鼠标回调 ============
def mouse_callback(event, x, y, flags, param):
    global click_points, click_labels

    if not click_mode:
        return

    if event == cv2.EVENT_LBUTTONDOWN:
        click_points.append([x, y])
        click_labels.append(1)
        print(f"✓ 前景点: ({x}, {y})")
    elif event == cv2.EVENT_RBUTTONDOWN:
        click_points.append([x, y])
        click_labels.append(0)
        print(f"✓ 背景点: ({x}, {y})")

cv2.namedWindow('SAM3 with Instance Tracking')
cv2.setMouseCallback('SAM3 with Instance Tracking', mouse_callback)

# ============ 辅助函数 ============
def process_frame_with_text(frame, text_prompt):
    """使用文本提示处理单帧"""
    try:
        image_rgb = cv2.cvtColor(frame, cv2.COLOR_BGR2RGB)
        pil_image = Image.fromarray(image_rgb)

        inference_state = processor.set_image(pil_image)
        output = processor.set_text_prompt(state=inference_state, prompt=text_prompt)

        masks = output["masks"].cpu().numpy()
        boxes = output["boxes"].cpu().numpy()
        scores = output["scores"].cpu().numpy()

        return masks, boxes, scores
    except Exception as e:
        print(f"处理失败: {e}")
        return None, None, None

def process_frame_with_points(frame, points, labels):
    """使用点提示处理单帧"""
    try:
        image_rgb = cv2.cvtColor(frame, cv2.COLOR_BGR2RGB)
        pil_image = Image.fromarray(image_rgb)

        inference_state = processor.set_image(pil_image)
        output = processor.set_point_prompt(
            state=inference_state,
            points=np.array(points),
            labels=np.array(labels)
        )

        masks = output["masks"].cpu().numpy()
        boxes = output["boxes"].cpu().numpy()
        scores = output["scores"].cpu().numpy()

        return masks, boxes, scores
    except Exception as e:
        print(f"处理失败: {e}")
        return None, None, None

def draw_results(frame, masks, boxes, scores, instance_ids):
    """绘制分割结果(带实例ID)"""
    if masks is None or len(masks) == 0:
        return frame

    result = frame.copy()

    for i, (mask, box, score, inst_id) in enumerate(zip(masks, boxes, scores, instance_ids)):
        # 处理mask维度
        if len(mask.shape) == 3:
            mask = mask[0]

        # 调整mask尺寸
        if mask.shape != (height, width):
            mask = cv2.resize(mask.astype(np.float32), (width, height),
                            interpolation=cv2.INTER_NEAREST)

        mask_bool = mask > 0.5
        if not np.any(mask_bool):
            continue

        # 使用实例ID选择颜色(确保同一ID颜色一致)
        color = colors[inst_id % len(colors)]

        # 半透明填充
        overlay = result.copy()
        overlay[mask_bool] = color
        result = cv2.addWeighted(result, 0.65, overlay, 0.35, 0)

        # 轮廓
        mask_uint8 = (mask_bool * 255).astype(np.uint8)
        contours, _ = cv2.findContours(mask_uint8, cv2.RETR_EXTERNAL,
                                       cv2.CHAIN_APPROX_SIMPLE)
        cv2.drawContours(result, contours, -1, color, 3)

        # 边界框
        x1, y1, x2, y2 = box.astype(int)
        cv2.rectangle(result, (x1, y1), (x2, y2), color, 3)

        # 计算质心
        M = cv2.moments(mask_uint8)
        if M["m00"] != 0:
            cx = int(M["m10"] / M["m00"])
            cy = int(M["m01"] / M["m00"])

            # 显示ID(大字体,黑色背景)
            id_text = f"ID:{inst_id}"
            text_size = cv2.getTextSize(id_text, cv2.FONT_HERSHEY_SIMPLEX, 1.2, 3)[0]

            # 黑色背景
            cv2.rectangle(result,
                         (cx - text_size[0]//2 - 8, cy - text_size[1]//2 - 8),
                         (cx + text_size[0]//2 + 8, cy + text_size[1]//2 + 8),
                         (0, 0, 0), -1)

            # ID文本
            cv2.putText(result, id_text,
                       (cx - text_size[0]//2, cy + text_size[1]//2),
                       cv2.FONT_HERSHEY_SIMPLEX, 1.2, color, 3)

        # 在边界框上方显示分数
        label = f"Score:{score:.2f}"
        cv2.putText(result, label, (x1, y1 - 10),
                   cv2.FONT_HERSHEY_SIMPLEX, 0.6, color, 2)

    return result

# ============ 主循环 ============
print("\n" + "="*70)
print("SAM3 图像模式 + 实例ID跟踪")
print("="*70)
print("特点: 每帧独立检测 + 跨帧ID匹配")
print()
print("操作:")
print("  [T] - 使用文本提示")
print("  [C] - 使用点击提示")
print("  [Space] - 开始/停止跟踪")
print("  [R] - 重置(包括ID)")
print("  [Q] - 退出")
print("="*70)
print()

try:
    while True:
        ret, frame = cap.read()
        if not ret:
            break

        # FPS计算
        fps_count += 1
        if fps_count % 30 == 0:
            display_fps = 30 / (time.time() - fps_start)
            fps_start = time.time()

        result_frame = frame.copy()

        # 跟踪模式
        if is_tracking:
            process_start = time.time()

            if use_text:
                masks, boxes, scores = process_frame_with_text(frame, current_prompt)
            else:
                masks, boxes, scores = process_frame_with_points(frame, click_points, click_labels)

            process_time = time.time() - process_start

            if masks is not None and len(masks) > 0:
                # 更新跟踪器,获取实例ID
                instance_ids = tracker.update(boxes)

                # 绘制结果
                result_frame = draw_results(frame, masks, boxes, scores, instance_ids)

                cv2.putText(result_frame, f"Tracking: {len(masks)} objects",
                           (10, 60), cv2.FONT_HERSHEY_SIMPLEX, 0.8, (0, 255, 0), 2)
                cv2.putText(result_frame, f"Process: {process_time*1000:.1f}ms",
                           (10, 90), cv2.FONT_HERSHEY_SIMPLEX, 0.6, (255, 255, 0), 2)
                cv2.putText(result_frame, f"Active IDs: {len(tracker.objects)}",
                           (10, 120), cv2.FONT_HERSHEY_SIMPLEX, 0.6, (255, 255, 255), 2)
            else:
                # 没有检测到物体,更新跟踪器
                tracker.update([])
                cv2.putText(result_frame, "No objects detected",
                           (10, 60), cv2.FONT_HERSHEY_SIMPLEX, 0.8, (0, 0, 255), 2)

        # 点击模式
        elif click_mode:
            for i, pt in enumerate(click_points):
                color = (0, 255, 0) if click_labels[i] == 1 else (0, 0, 255)
                cv2.circle(result_frame, tuple(pt), 6, color, -1)
                cv2.circle(result_frame, tuple(pt), 8, (255, 255, 255), 2)

            cv2.putText(result_frame, f"Click mode: {len(click_points)} points",
                       (10, 60), cv2.FONT_HERSHEY_SIMPLEX, 0.8, (0, 255, 255), 2)
            cv2.putText(result_frame, "Press SPACE to start",
                       (10, 90), cv2.FONT_HERSHEY_SIMPLEX, 0.7, (255, 255, 0), 2)

        # 待命模式
        else:
            cv2.putText(result_frame, "Press [T] for text or [C] for click",
                       (10, 60), cv2.FONT_HERSHEY_SIMPLEX, 0.8, (255, 255, 255), 2)

        # FPS显示
        cv2.putText(result_frame, f"FPS: {display_fps:.1f}",
                   (10, 30), cv2.FONT_HERSHEY_SIMPLEX, 0.8, (255, 255, 255), 2)

        cv2.imshow('SAM3 with Instance Tracking', result_frame)

        # 按键处理
        key = cv2.waitKey(1) & 0xFF

        if key == ord('q'):
            break

        elif key == ord('t'):
            print("\n输入文本提示:")
            prompt = input("> ").strip()
            if prompt:
                current_prompt = prompt
                use_text = True
                click_mode = False
                print(f"✓ 文本提示: '{prompt}'")

        elif key == ord('c'):
            click_mode = True
            click_points = []
            click_labels = []
            use_text = False
            is_tracking = False
            print("\n点击模式 - 左键=前景,右键=背景")

        elif key == ord(' '):
            if click_mode and len(click_points) > 0:
                click_mode = False
                is_tracking = True
                tracker.reset()  # 重置跟踪器
                print(f"\n✓ 开始跟踪 ({len(click_points)} 个点)")
            elif use_text:
                is_tracking = not is_tracking
                if is_tracking:
                    tracker.reset()  # 重置跟踪器
                    print(f"\n✓ 开始跟踪 ('{current_prompt}')")
                else:
                    print("\n⏸ 暂停跟踪")

        elif key == ord('r'):
            print("\n重置...")
            is_tracking = False
            click_mode = False
            click_points = []
            click_labels = []
            use_text = True
            tracker.reset()
            print("✓ 重置完成(ID已清零)")

except KeyboardInterrupt:
    print("\n用户中断")
except Exception as e:
    print(f"\n错误: {e}")
    import traceback
    traceback.print_exc()

finally:
    cap.release()
    cv2.destroyAllWindows()
    print("✓ 完成!")
--------------------------------------------------------------------------------------------------------------------------------
无prompt的所有mask分割
核心思路是:在图像上生成均匀的点网格,用这些点作为 prompt 来触发分割(这是 SAM1 的 AutomaticMaskGenerator 原理)。
import torch
import numpy as np
import matplotlib.pyplot as plt
from PIL import Image

from sam3.model_builder import build_tracker, _create_vision_backbone, download_ckpt_from_hf
from sam3.model.sam1_task_predictor import SAM3InteractiveImagePredictor
from sam3.model.vl_combiner import SAM3VLBackbone

# ========== 构建预测器 ==========
def build_sam3_point_predictor(checkpoint_path=None, device="cuda"):
    print("🔧 构建SAM3点prompt预测器...")

    vision_backbone = _create_vision_backbone(enable_inst_interactivity=True)
    backbone = SAM3VLBackbone(scalp=1, visual=vision_backbone, text=None)

    tracker = build_tracker(apply_temporal_disambiguation=False, with_backbone=False)
    tracker.backbone = backbone

    predictor = SAM3InteractiveImagePredictor(tracker)

    if checkpoint_path is None:
        checkpoint_path = download_ckpt_from_hf()

    ckpt = torch.load(checkpoint_path, map_location="cpu", weights_only=True)
    if "model" in ckpt:
        ckpt = ckpt["model"]

    tracker_ckpt = {k.replace("tracker.", ""): v for k, v in ckpt.items() if "tracker" in k}
    tracker.load_state_dict(tracker_ckpt, strict=False)

    backbone_ckpt = {}
    for k, v in ckpt.items():
        if "detector.backbone.vision_backbone" in k or "detector.backbone.visual" in k:
            new_key = k.replace("detector.backbone.", "")
            backbone_ckpt[new_key] = v
    if backbone_ckpt:
        backbone.load_state_dict(backbone_ckpt, strict=False)

    predictor = predictor.to(device)
    predictor.eval()

    print("✅ 预测器构建完成!")
    return predictor


# ========== 自动Mask生成器 ==========
class Sam3AutomaticMaskGenerator:
    def __init__(self, predictor,
                 points_per_side: int = 32,
                 pred_iou_thresh: float = 0.7,
                 stability_score_thresh: float = 0.8,
                 min_mask_region_area: int = 100,
                 max_mask_region_ratio: float = 0.8,
                 nms_thresh: float = 0.7):
        self.predictor = predictor
        self.points_per_side = points_per_side
        self.pred_iou_thresh = pred_iou_thresh
        self.stability_score_thresh = stability_score_thresh
        self.min_mask_region_area = min_mask_region_area
        self.max_mask_region_ratio = max_mask_region_ratio
        self.nms_thresh = nms_thresh

    def _generate_point_grid(self, img_height, img_width):
        x = np.linspace(0, img_width, self.points_per_side + 2)[1:-1]
        y = np.linspace(0, img_height, self.points_per_side + 2)[1:-1]
        xx, yy = np.meshgrid(x, y)
        return np.stack([xx.flatten(), yy.flatten()], axis=1)

    def _compute_iou(self, mask1, mask2):
        intersection = np.logical_and(mask1, mask2).sum()
        union = np.logical_or(mask1, mask2).sum()
        return intersection / (union + 1e-8)

    def _nms_masks(self, masks, scores):
        if len(masks) == 0:
            return [], []
        indices = np.argsort(scores)[::-1]
        keep_masks, keep_scores = [], []
        while len(indices) > 0:
            idx = indices[0]
            keep_masks.append(masks[idx])
            keep_scores.append(scores[idx])
            remaining = [i for i in indices[1:] if self._compute_iou(masks[idx], masks[i]) < self.nms_thresh]
            indices = remaining
        return keep_masks, keep_scores

    def _process_mask(self, mask):
        """将logits转换为二值mask"""
        if mask.min() < 0 or mask.max() > 1:
            mask_sigmoid = 1 / (1 + np.exp(-mask.astype(np.float32).clip(-50, 50)))
        else:
            mask_sigmoid = mask
        return (mask_sigmoid > 0.5).astype(bool)

    def _compute_stability_score(self, logits, threshold_offset=1.0):
        high_thresh = (logits > threshold_offset).sum()
        low_thresh = (logits > -threshold_offset).sum()
        return float(high_thresh / (low_thresh + 1e-8))

    def generate(self, image):
        if isinstance(image, Image.Image):
            image_np = np.array(image)
        else:
            image_np = image

        img_height, img_width = image_np.shape[:2]
        total_pixels = img_height * img_width

        self.predictor.set_image(image_np)

        points = self._generate_point_grid(img_height, img_width)
        print(f"🔍 使用 {len(points)} 个采样点进行自动分割...")

        all_masks, all_scores = [], []

        for i, point in enumerate(points):
            try:
                masks, scores, logits = self.predictor.predict(
                    point_coords=np.array([[point[0], point[1]]]),
                    point_labels=np.array([1]),
                    multimask_output=True,
                    return_logits=True
                )

                # 选择分数最高的mask
                best_idx = np.argmax(scores)
                mask = masks[best_idx]
                score = scores[best_idx]
                logit = logits[best_idx]

                if score < self.pred_iou_thresh:
                    continue

                binary_mask = self._process_mask(mask)

                stability = self._compute_stability_score(logit)
                if stability < self.stability_score_thresh:
                    continue

                mask_area = binary_mask.sum()
                if mask_area < self.min_mask_region_area:
                    continue
                if mask_area > self.max_mask_region_ratio * total_pixels:
                    continue

                all_masks.append(binary_mask)
                all_scores.append(float(score))

            except Exception as e:
                if i == 0:
                    print(f"   ⚠️ 错误: {e}")
                continue

        print(f"   收集到 {len(all_masks)} 个候选masks")

        if len(all_masks) == 0:
            return []

        final_masks, final_scores = self._nms_masks(all_masks, all_scores)
        print(f"   NMS后保留 {len(final_masks)} 个masks")

        results = []
        for mask, score in zip(final_masks, final_scores):
            rows = np.any(mask, axis=1)
            cols = np.any(mask, axis=0)
            if not np.any(rows) or not np.any(cols):
                continue
            y1, y2 = np.where(rows)[0][[0, -1]]
            x1, x2 = np.where(cols)[0][[0, -1]]

            results.append({
                'segmentation': mask,
                'area': int(mask.sum()),
                'bbox': [int(x1), int(y1), int(x2-x1), int(y2-y1)],
                'predicted_iou': score,
                'box_xyxy': [int(x1), int(y1), int(x2), int(y2)]
            })

        results.sort(key=lambda x: x['area'], reverse=True)
        return results


# ========== 可视化函数 ==========
def visualize_instances(image, results, save_path="instance_segmentation.png"):
    """可视化实例分割结果,每个实例不同颜色"""
    if isinstance(image, Image.Image):
        image_np = np.array(image)
    else:
        image_np = image.copy()

    h, w = image_np.shape[:2]
    n_instances = len(results)

    if n_instances == 0:
        print("没有检测到实例")
        return

    # 为每个实例生成不同的颜色
    colors = plt.cm.tab20(np.linspace(0, 1, max(n_instances, 20)))[:n_instances]

    # 创建彩色实例图
    instance_overlay = image_np.copy().astype(np.float64)
    instance_map = np.zeros((h, w), dtype=np.int32)  # 实例ID图

    for i, result in enumerate(results):
        mask = result['segmentation'].astype(bool)
        color = colors[i][:3]  # RGB

        # 叠加颜色
        for c in range(3):
            instance_overlay[:,:,c][mask] = instance_overlay[:,:,c][mask] * 0.4 + color[c] * 255 * 0.6

        # 记录实例ID (从1开始)
        instance_map[mask] = i + 1

    # 可视化
    fig, axes = plt.subplots(2, 2, figsize=(14, 12))

    # 1. 原图
    axes[0, 0].imshow(image_np)
    axes[0, 0].set_title("Original Image", fontsize=14)
    axes[0, 0].axis('off')

    # 2. 实例分割(彩色叠加)
    axes[0, 1].imshow(instance_overlay.astype(np.uint8))
    axes[0, 1].set_title(f"Instance Segmentation ({n_instances} instances)", fontsize=14)
    axes[0, 1].axis('off')

    # 3. 实例ID图(每个实例不同颜色的纯mask)
    # 创建彩色mask图(无原图背景)
    colored_mask = np.zeros((h, w, 3), dtype=np.uint8)
    for i, result in enumerate(results):
        mask = result['segmentation'].astype(bool)
        color = (colors[i][:3] * 255).astype(np.uint8)
        colored_mask[mask] = color

    axes[1, 0].imshow(colored_mask)
    axes[1, 0].set_title("Instance Masks (colored)", fontsize=14)
    axes[1, 0].axis('off')

    # 4. 带边界框和标签
    axes[1, 1].imshow(image_np)
    for i, result in enumerate(results):
        box = result['box_xyxy']
        score = result['predicted_iou']
        color = colors[i][:3]

        x1, y1, x2, y2 = box
        rect = plt.Rectangle((x1, y1), x2-x1, y2-y1,
                             fill=False, color=color, linewidth=2)
        axes[1, 1].add_patch(rect)
        axes[1, 1].text(x1, y1-3, f"{i+1}", fontsize=10, fontweight='bold',
                       color='white', bbox=dict(boxstyle="round,pad=0.2", fc=color, alpha=0.8))
    axes[1, 1].set_title("Bounding Boxes", fontsize=14)
    axes[1, 1].axis('off')

    plt.tight_layout()
    plt.savefig(save_path, dpi=150, bbox_inches='tight')
    print(f"✅ 结果保存到 {save_path}")
    plt.show()

    # 打印每个实例的信息
    print(f"\n📊 检测到 {n_instances} 个实例:")
    for i, result in enumerate(results):
        print(f"   实例 {i+1}: score={result['predicted_iou']:.3f}, area={result['area']}")

    return instance_overlay, colored_mask


# ========== 主程序 ==========
print("=" * 60)
print("SAM3 自动实例分割")
print("=" * 60)

# 构建预测器
predictor = build_sam3_point_predictor(
    checkpoint_path="checkpoint/sam3.pt",
    device="cuda" if torch.cuda.is_available() else "cpu"
)

# 创建生成器
mask_generator = Sam3AutomaticMaskGenerator(
    predictor,
    points_per_side=16,
    pred_iou_thresh=0.7,
    stability_score_thresh=0.7,
    min_mask_region_area=1000,
    max_mask_region_ratio=0.5,   # 过滤掉超过50%图像的大mask(背景)
    nms_thresh=0.5
)

# 加载图像
image = Image.open(r"D:\vscode\python_project\sam3-main\cat3.png")

# 生成实例分割
results = mask_generator.generate(image)

print(f"\n✅ 找到 {len(results)} 个实例")

# 可视化
if len(results) > 0:
    visualize_instances(image, results, "instance_segmentation.png")

    # 保存每个实例的单独mask
    for i, result in enumerate(results):
        mask = result['segmentation']
        mask_img = Image.fromarray((mask * 255).astype(np.uint8))
        mask_img.save(f"instance_{i+1}_mask.png")
    print(f"\n✅ 单独mask已保存: instance_1_mask.png ~ instance_{len(results)}_mask.png")
else:
    print("未检测到任何实例")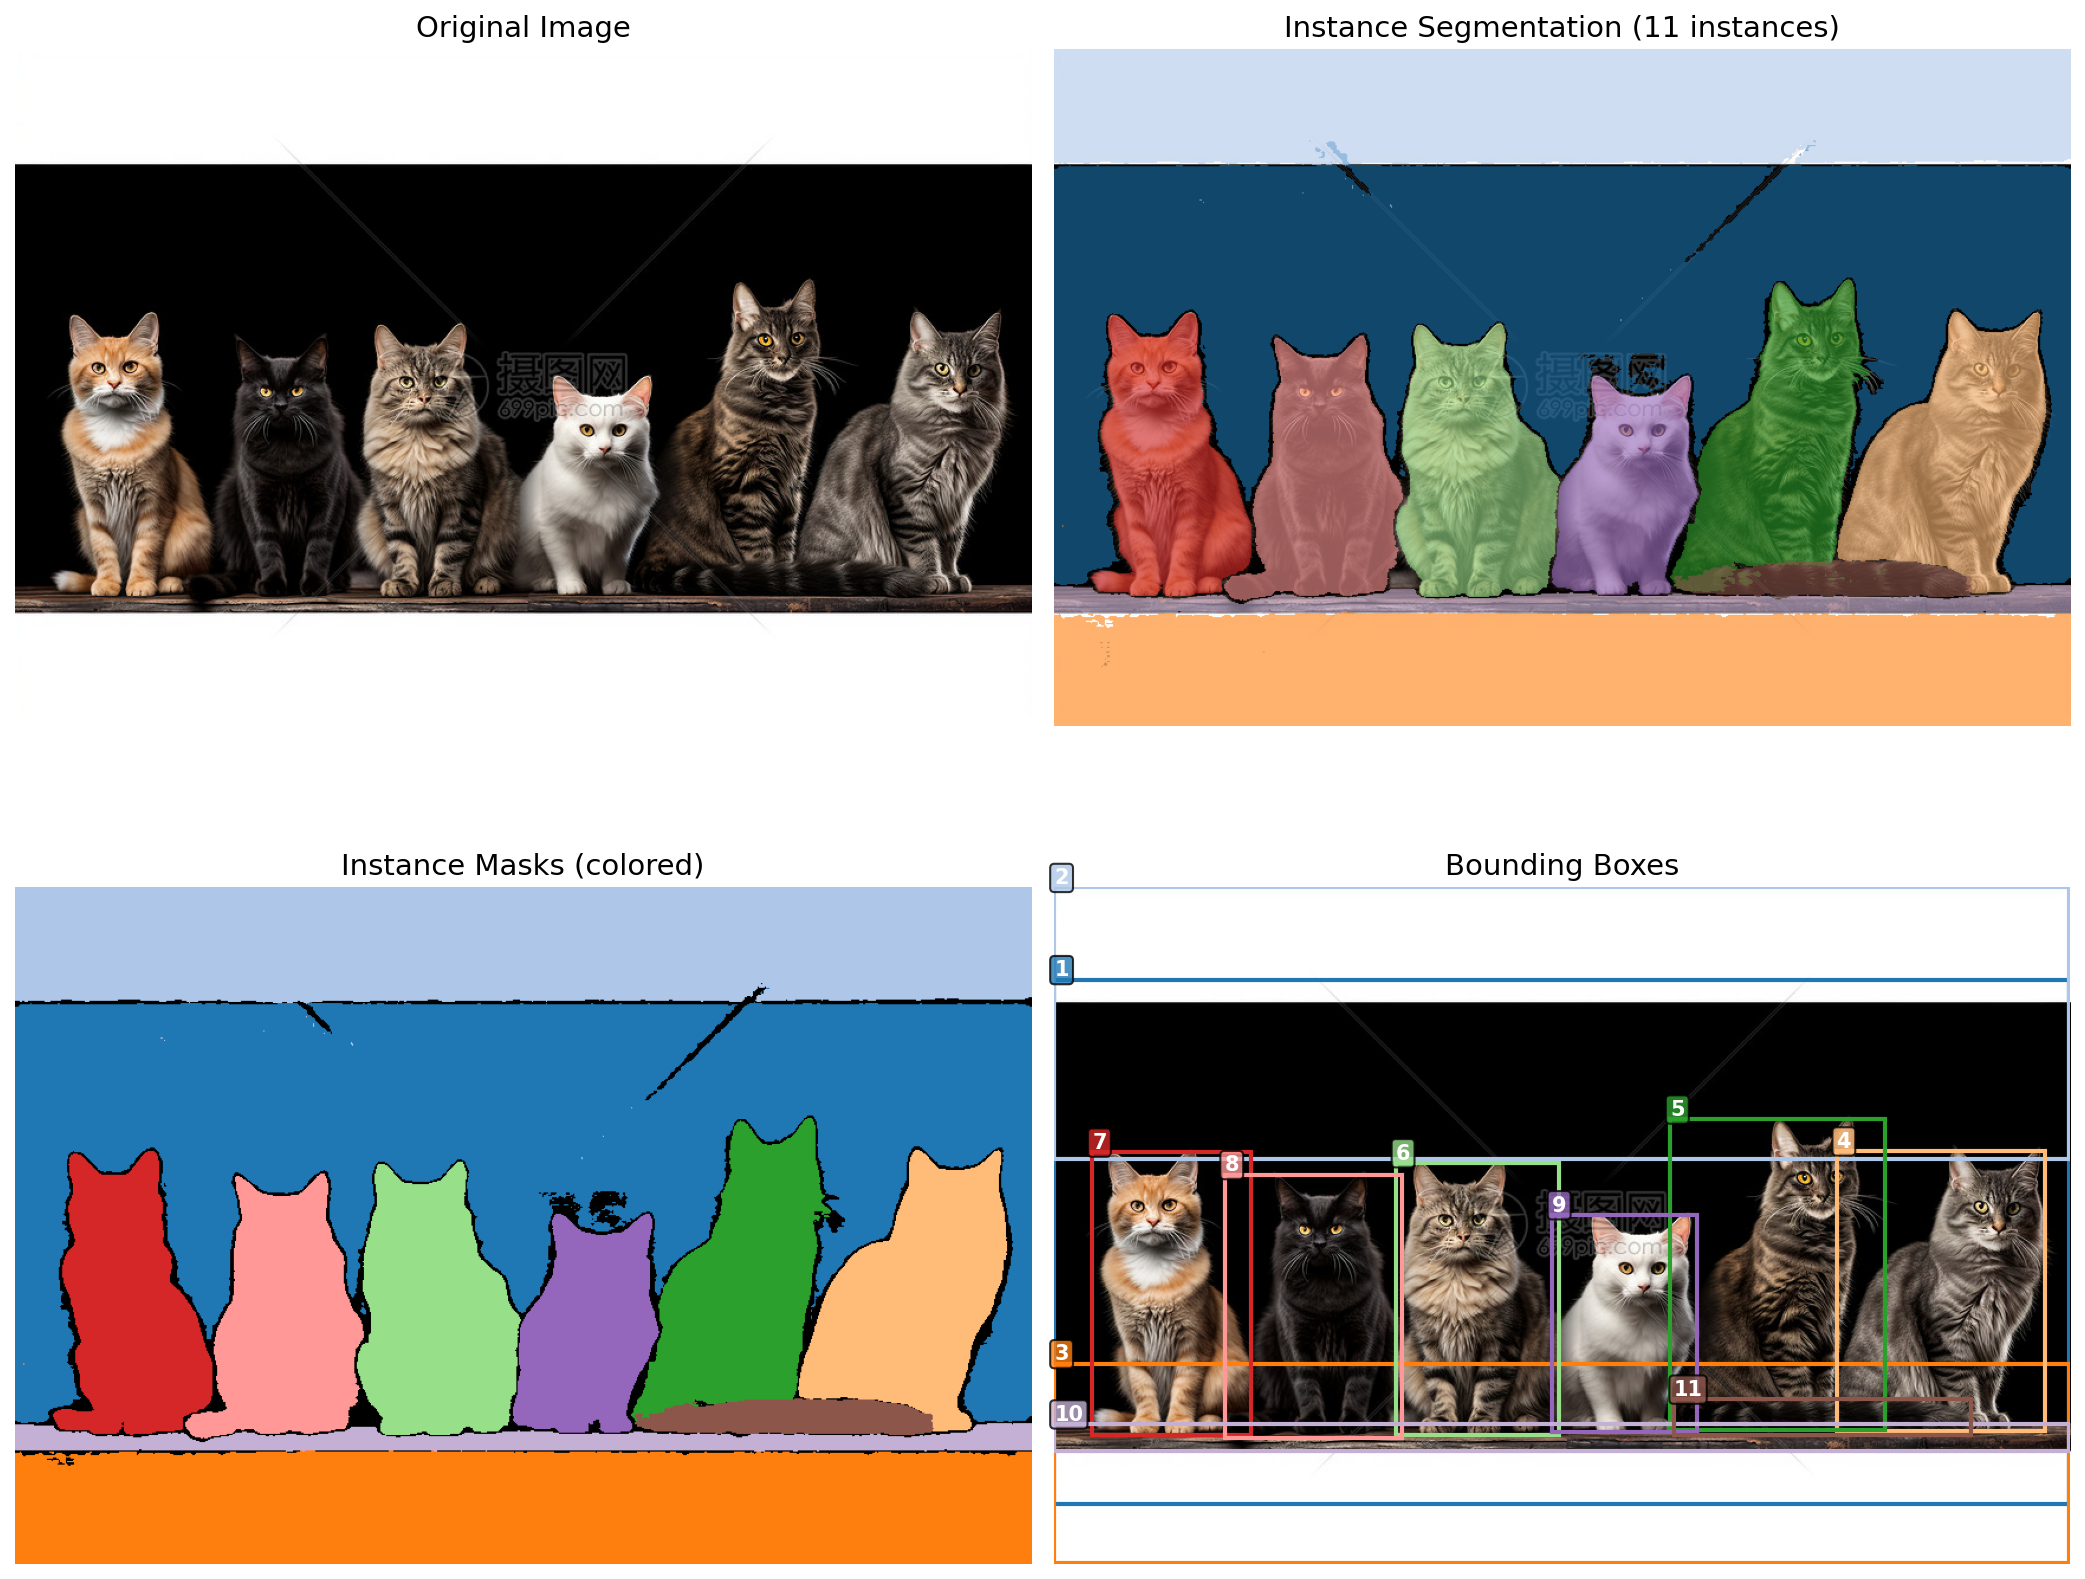
核心改动:
| 原代码 | 修改后 | |
processor.set_text_prompt(prompt="...") |
|
目前来说SAM3的效果是真牛,开放性词汇分割,我觉得真的是玩儿的太牛了。期待后续各个大佬们的发散创造。
期待各位朋友们有没有什么想法之类的,欢迎评论区讨论,未来的分割方向如何。
个人感觉分割,目标检测,追踪马上就算是一种任务了
----------------------------------------------------------------------------------
续上面的内容:
对于实例分割目标检测的结果性能查看:
ID混淆是追踪任务的痛点,SAM3目前大幅度改善了追踪任务的ID混淆
sam3权重下载地址:
通过网盘分享的文件:权重
链接: https://pan.baidu.com/s/1vG7_meIz_3YXwruxX5Fzbw?pwd=1111 提取码: 1111
--来自百度网盘超级会员v4的分享
转载自CSDN-专业IT技术社区
原文链接:https://blog.csdn.net/qq_58949158/article/details/155102282