
SAM3开头
从“分割万物”到“理解万物”,Meta 推出的 SAM 3 实现了计算机视觉的范式跃迁。不同于前代依赖点击或框选,SAM 3 引入了提示词概念分割(PCS),通过 Transformer 架构与 DETR 检测器的融合,让模型能直接通过文字或示例图识别并追踪所有同类目标。其推论速度快至毫秒级,不仅在 SA-Co 评测中展现了极强的零样本迁移能力。
SAM3官网:SAM 3![]() https://ai.meta.com/research/sam3/
https://ai.meta.com/research/sam3/
SAM3代码地址:facebookresearch/sam3: The repository provides code for running inference and finetuning with the Meta Segment Anything Model 3 (SAM 3), links for downloading the trained model checkpoints, and example notebooks that show how to use the model.![]() https://github.com/facebookresearch/sam3SAM3论文:[2511.16719] SAM 3: Segment Anything with Concepts
https://github.com/facebookresearch/sam3SAM3论文:[2511.16719] SAM 3: Segment Anything with Concepts![]() https://arxiv.org/abs/2511.16719
https://arxiv.org/abs/2511.16719
SAM3主体提取
SAM3是一个体积非常大的大模型,如果不想本地部署,可访问SAM3官网,选择"Try the playground"快速开始,准备并上传视频。

搜索你想要的Object,无问题后,点击"Search entire video",如果需要再添加主体,那么继续选择"Add Object",没有则选择"Continue to effects"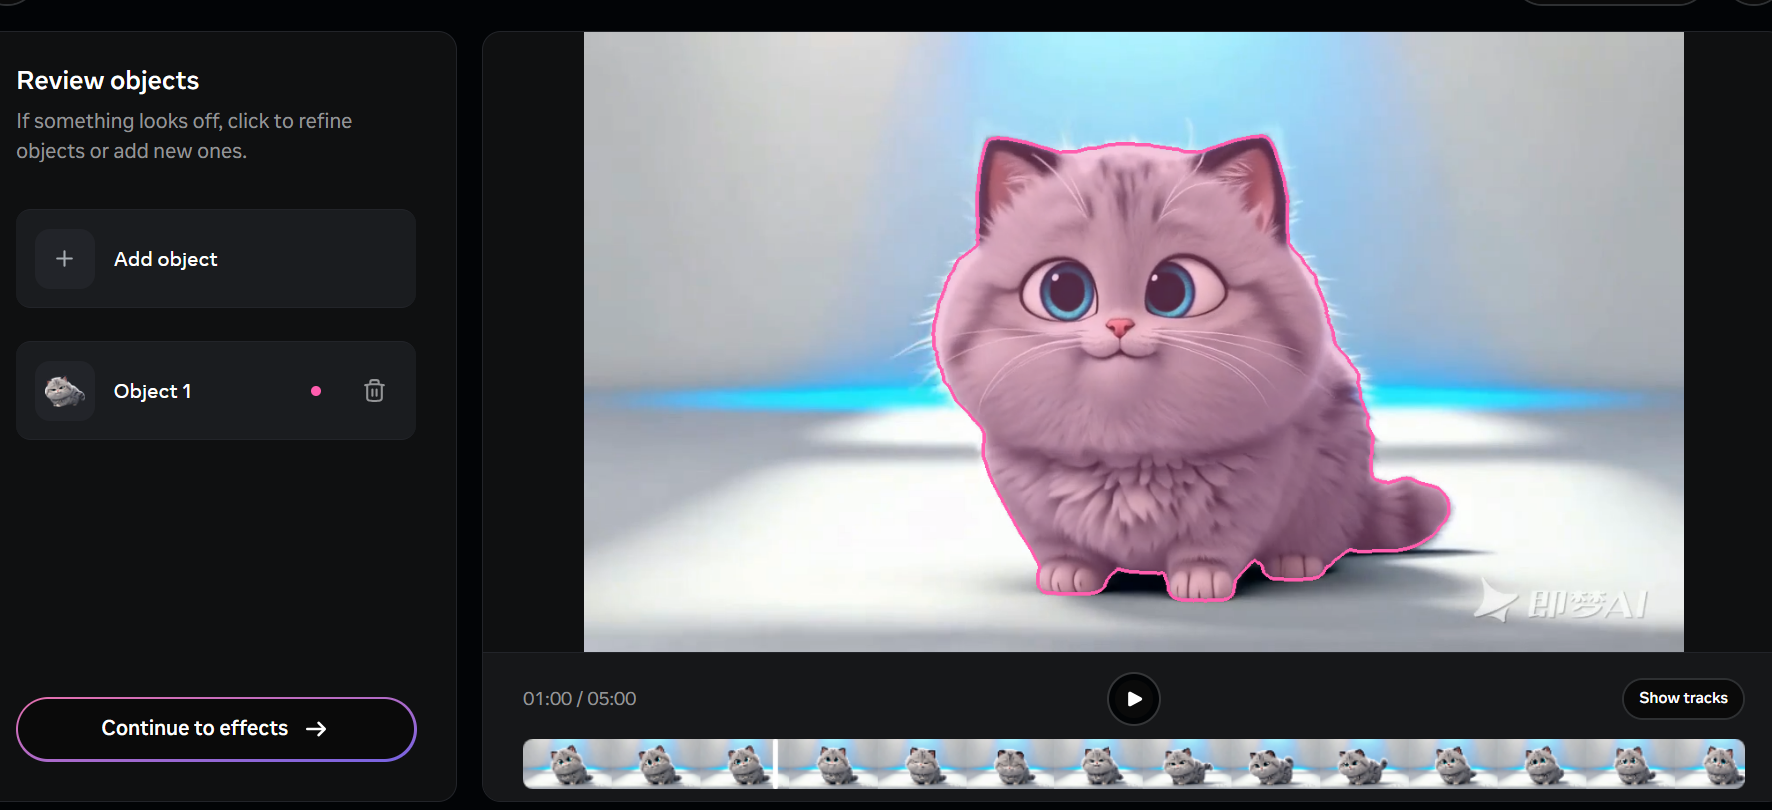
为了剔除背景,点击"Add effect",选择"Background"再选择"Color fill",最后删除"Highlight"
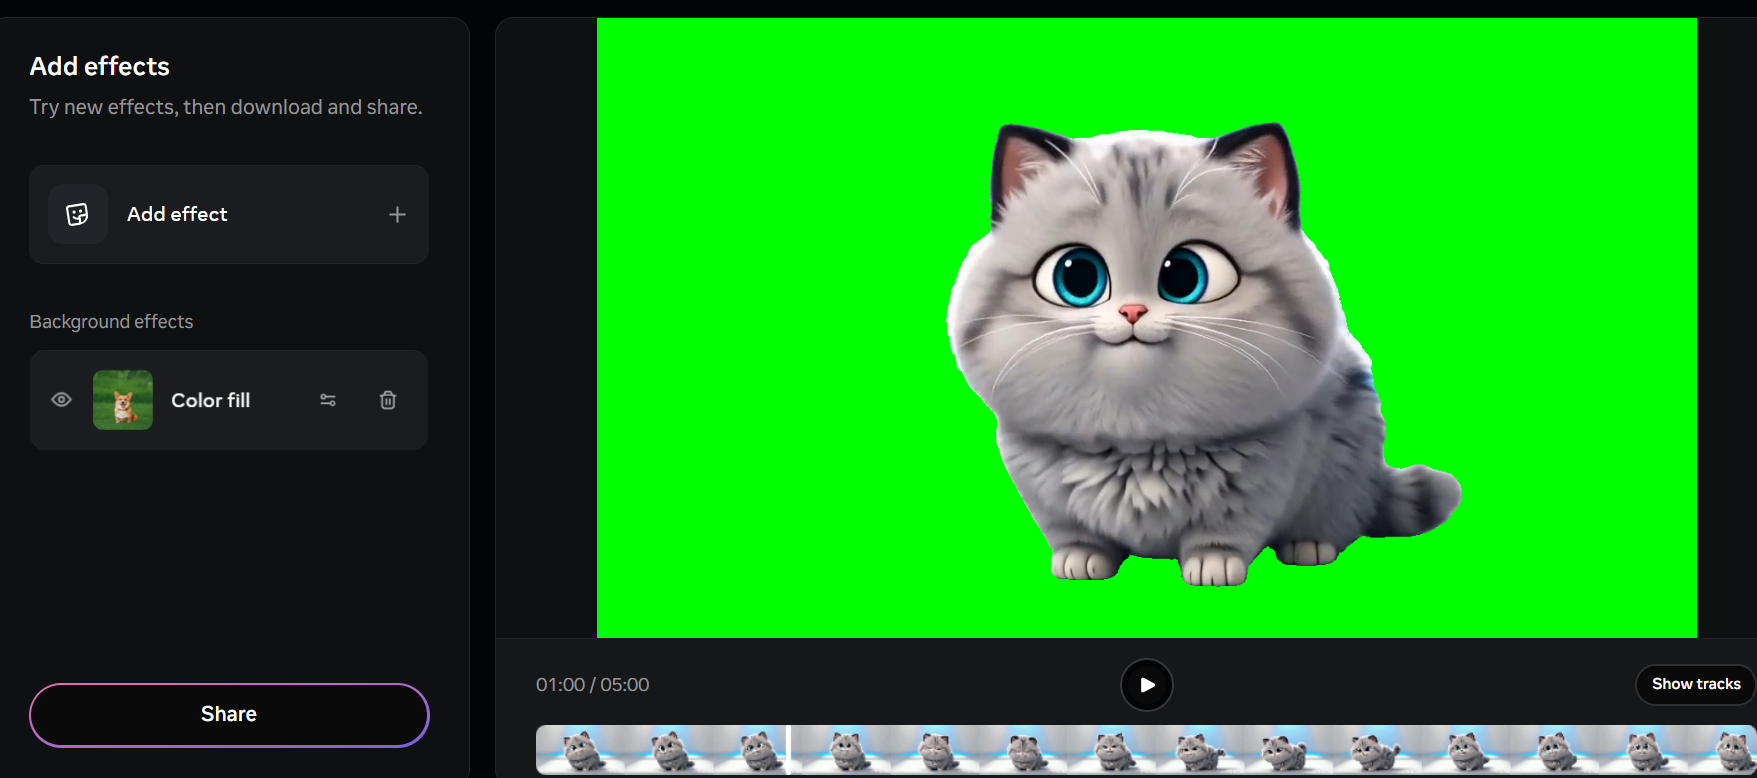
没有任何问题后,点击"Share"去下载视频
Unity绿幕背景去除
将下面这段着Shader代码拖拽到Unity项目中,Shader代码参考GITHUB:otdavies/UnityChromakey: A simple, yet powerful chromakey / greenscreen solution for Unity. Designed to be used with virtual production.![]() https://github.com/otdavies/UnityChromakey
https://github.com/otdavies/UnityChromakey
// Created by Oliver Davies. Enjoy.
// [email protected]

Shader "Unlit/ChromaKey"
{
    Properties
    {
        _MainTex ("Texture", 2D) = "white" {}
        _KeyColor("KeyColor", Color) = (0,1,0,0)
        _TintColor("TintColor", Color) = (1,1,1,1)
        _ColorCutoff("Cutoff", Range(0, 1)) = 0.2
        _ColorFeathering("ColorFeathering", Range(0, 1)) = 0.33
        _MaskFeathering("MaskFeathering", Range(0, 1)) = 1
        _Sharpening("Sharpening", Range(0, 1)) = 0.5

        _Despill("DespillStrength", Range(0, 1)) = 1
        _DespillLuminanceAdd("DespillLuminanceAdd", Range(0, 1)) = 0.2
    }
    SubShader
    {
        Tags
        {
            // "RenderPipeline"="HDRenderPipeline"
            // "RenderType"="HDUnlitShader"
            "Queue" = "Transparent+1"
        }

        Blend SrcAlpha OneMinusSrcAlpha
        ZWrite Off
        cull off

        Pass
        {
            CGPROGRAM

            #pragma vertex vert
            #pragma fragment frag

            #include "UnityCG.cginc"

            struct appdata
            {
                float4 vertex : POSITION;
                float2 uv : TEXCOORD0;
            };

            struct v2f
            {
                float2 uv : TEXCOORD0;
                float4 vertex : SV_POSITION;
            };

            sampler2D _MainTex;
            float4 _MainTex_TexelSize;
            float4 _MainTex_ST;
            float4 _KeyColor;
            float4 _TintColor;
            float _ColorCutoff;
            float _ColorFeathering;
            float _MaskFeathering;
            float _Sharpening;
            float _Despill;
            float _DespillLuminanceAdd;

            // Utility functions -----------

            float rgb2y(float3 c)
            {
                return (0.299*c.r + 0.587*c.g + 0.114*c.b);
            }

            float rgb2cb(float3 c)
            {
                return (0.5 + -0.168736*c.r - 0.331264*c.g + 0.5*c.b);
            }

            float rgb2cr(float3 c)
            {
                return (0.5 + 0.5*c.r - 0.418688*c.g - 0.081312*c.b);
            }

            float colorclose(float Cb_p, float Cr_p, float Cb_key, float Cr_key, float tola, float tolb)
            {
                float temp = (Cb_key-Cb_p)*(Cb_key-Cb_p)+(Cr_key-Cr_p)*(Cr_key-Cr_p);
                float tola2 = tola*tola;
                float tolb2 = tolb*tolb;
                if (temp < tola2) return (0);
                if (temp < tolb2) return (temp-tola2)/(tolb2-tola2);
                return (1);
            }

            float maskedTex2D(sampler2D tex, float2 uv)
            {
                float4 color = tex2D(tex, uv);

                // Chroma key to CYK conversion
                float key_cb = rgb2cb(_KeyColor.rgb);
                float key_cr = rgb2cr(_KeyColor.rgb);
                float pix_cb = rgb2cb(color.rgb);
                float pix_cr = rgb2cr(color.rgb);

                return colorclose(pix_cb, pix_cr, key_cb, key_cr, _ColorCutoff, _ColorFeathering);
            }

            //-------------------------

            v2f vert (appdata v)
            {
                v2f o;
                o.vertex = UnityObjectToClipPos(v.vertex);
                o.uv = TRANSFORM_TEX(v.uv, _MainTex);
                return o;
            }

            float4 frag (v2f i) : SV_Target
            {
                // Get pixel width
                float2 pixelWidth = float2(1.0 / _MainTex_TexelSize.z, 0);
                float2 pixelHeight = float2(0, 1.0 / _MainTex_TexelSize.w);

                // Unmodified MainTex
                float4 color = tex2D(_MainTex, i.uv);

                // Unfeathered mask
                float mask = maskedTex2D(_MainTex, i.uv);

                // Feathering & smoothing
                float c = mask;
                float r = maskedTex2D(_MainTex, i.uv + pixelWidth);
                float l = maskedTex2D(_MainTex, i.uv - pixelWidth);
                float d = maskedTex2D(_MainTex, i.uv + pixelHeight);
                float u = maskedTex2D(_MainTex, i.uv - pixelHeight);
                float rd = maskedTex2D(_MainTex, i.uv + pixelWidth + pixelHeight) * .707;
                float dl = maskedTex2D(_MainTex, i.uv - pixelWidth + pixelHeight) * .707;
                float lu = maskedTex2D(_MainTex, i.uv - pixelHeight - pixelWidth) * .707;
                float ur = maskedTex2D(_MainTex, i.uv + pixelWidth - pixelHeight) * .707;
                float blurContribution = (r + l + d + u + rd + dl + lu + ur + c) * 0.12774655;
                float smoothedMask = smoothstep(_Sharpening, 1, lerp(c, blurContribution, _MaskFeathering));
                float4 result = color * smoothedMask;

                // Despill
                float v = (2*result.b+result.r)/4;
                if(result.g > v) result.g = lerp(result.g, v, _Despill);
                float4 dif = (color - result);
                float desaturatedDif = rgb2y(dif.xyz);
                result += lerp(0, desaturatedDif, _DespillLuminanceAdd);

                return float4(result.xyz, smoothedMask) * _TintColor;
            }
            ENDCG
        }
    }
}
把视频拖拽进去,视频拖拽进去可能会报错误:
Context: Getting duration.
Error details: <Empty>
Track types:
Video Track [1248 x 704], type: H264
UnityEngine.GUIUtility:ProcessEvent (int,intptr,bool&)
解决方法可以问AI,也可以通过FFmpeg去解决:
ffmpeg -i input.mp4 -c:v libx264 -pix_fmt yuv420p -movflags +faststart output.mp4
问题解决后,
新建一个Quad,Quad添加视频播放器组件Video Player,并把MP4视频拖拽到Video Player;
新建材质,材质选择"Unlit/ChromaKey",把材质挂载到Video Player
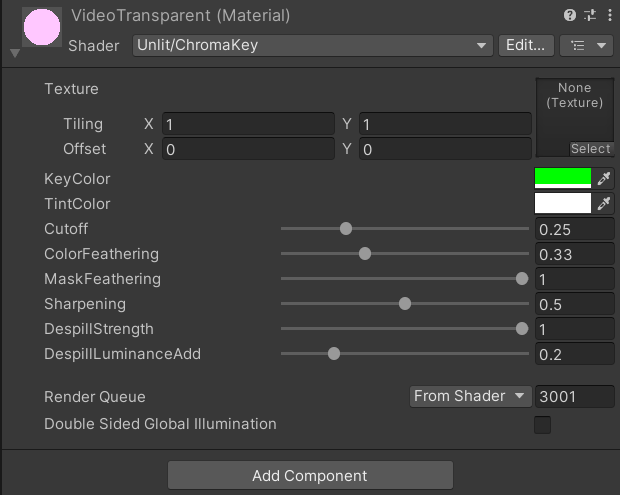
参数解释:
| 参数名 | 大白话理解(绿幕抠图场景) | 调大 / 调小的效果 |
|---|---|---|
| KeyColor(键控色) | 你要扣掉的颜色(比如绿幕选绿色,蓝幕选蓝色) | 选对颜色才能扣干净,选错了要么扣多要么扣少 |
| TintColor(染色) | 给扣完的画面 “加滤镜” | 调红色就偏红,调白色(默认)就是原图颜色,相当于控制滤镜叠加强度 |
| ColorCutoff(阈值) | “死抠线”—— 只要颜色和绿幕像到这个程度,直接扣没(完全透明) | 调大:连偏绿的颜色也扣掉(容易把人物边缘也扣没);调小:只扣纯绿(绿幕可能抠不干净) |
| ColorFeathering(颜色羽化) | “过渡线”—— 在 “死抠线” 外,留一段 “半透明区” | 调大:绿幕边缘过渡更柔和(无锯齿);调小:边缘生硬(像剪刀直接剪的) |
| MaskFeathering(蒙版羽化) | 给整个抠图边缘 “磨皮” | 调大:边缘更模糊(适合消除锯齿);调小:边缘更清晰(但可能出现毛边) |
| Sharpening(锐化) | 给 “磨皮” 后的边缘 “回点清晰度” | 调大:边缘更糊(抵消磨皮效果);调小:边缘更锐(避免磨皮过度导致细节丢失) |
| DespillStrength(去溢色) | 擦掉画面上沾到的 “绿气”(如人物边缘绿反光) | 调大:绿气擦得更干净(但过大会让画面发灰);调小:仍残留部分绿边 |
| DespillLuminanceAdd(亮度补偿) | 擦完绿气后,给画面 “补点亮度” | 调大:画面更亮(避免去溢色后发黑);调小:画面偏暗 |
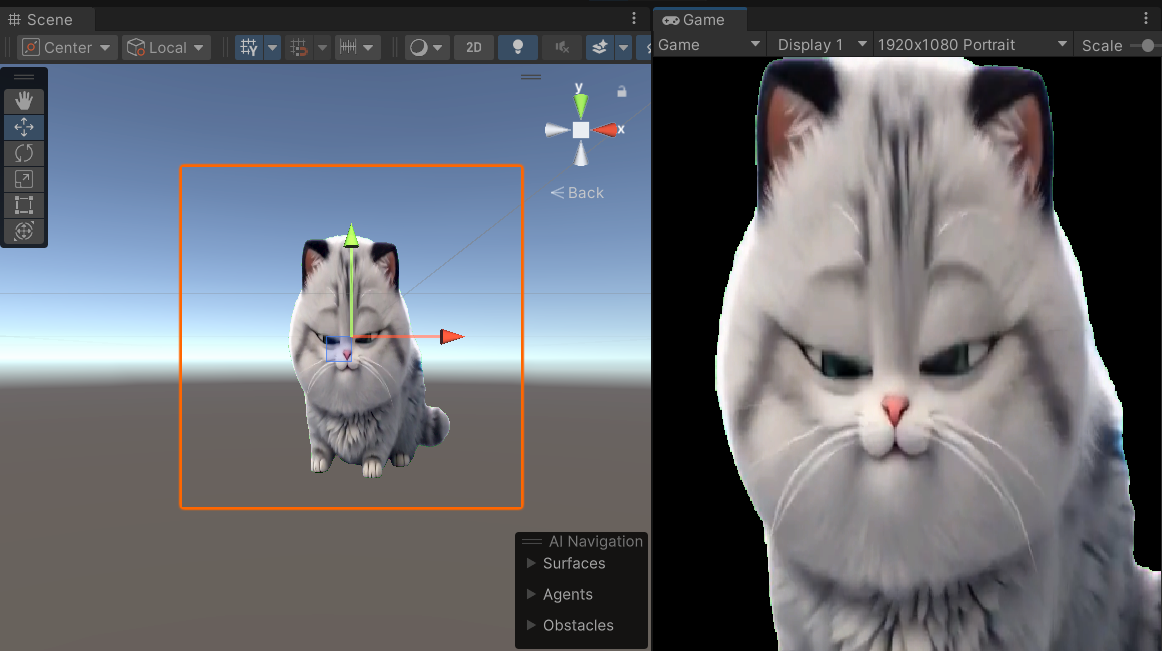
结果展示:
转载自CSDN-专业IT技术社区
原文链接:https://blog.csdn.net/weixin_64346531/article/details/157618202